Mochi 🍡
Mochi is a smart, interactive desktop companion and smartwatch alternative built on the ESP32-C3. Designed to be a minimalist productivity tool and digital pet, it features dynamic idle animations, BLE smartphone notifications, a pomodoro timer, and a captive portal for Wi-Fi and weather syncing—all controlled by a single capacitive touch sensor.
View the complete source code and assets on GitHub
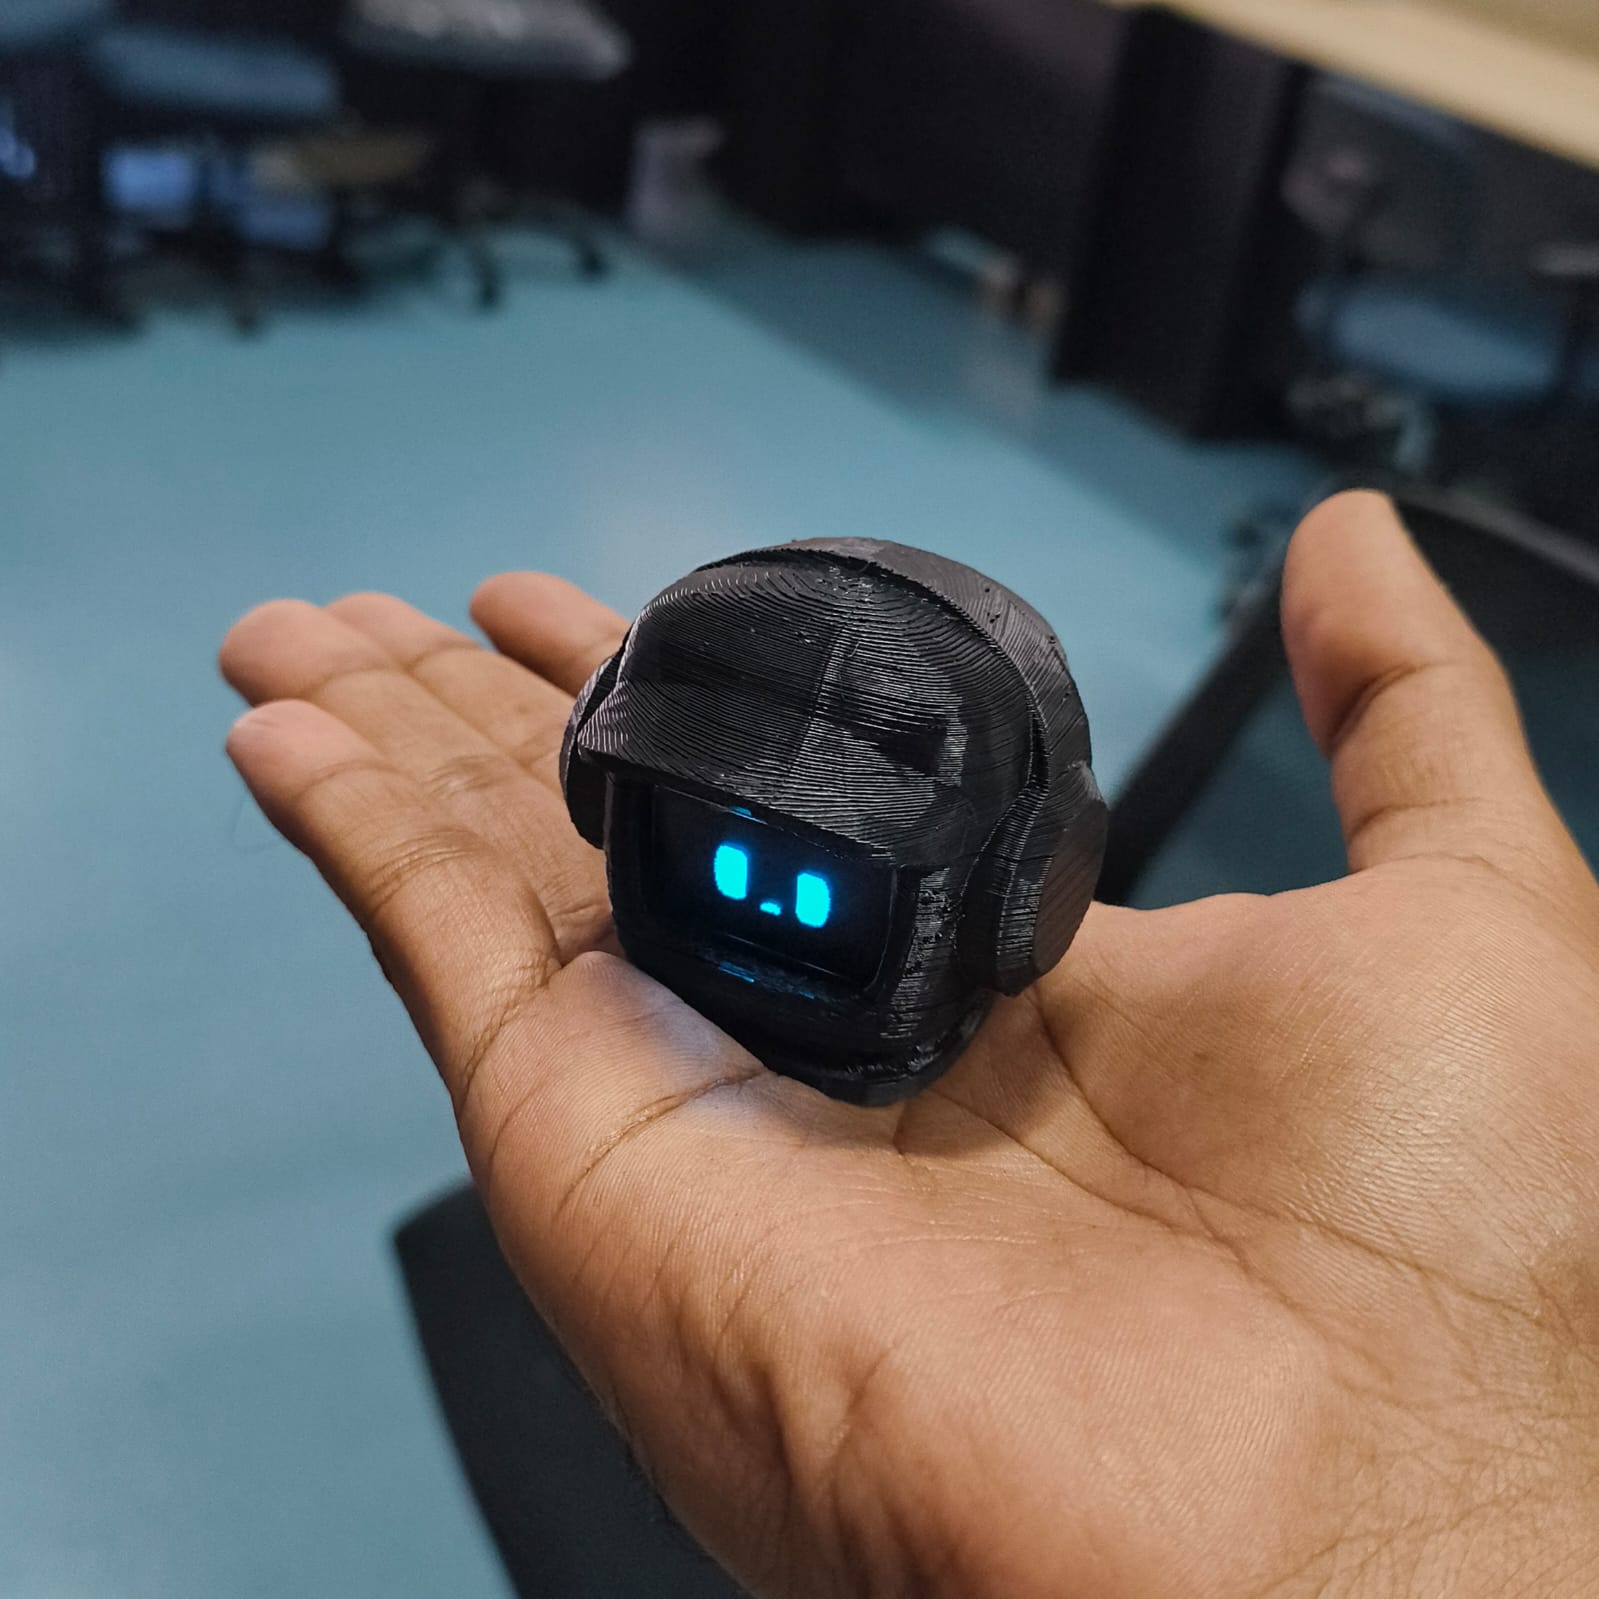
See Mochi in Action:
Tools & Workflow
Mochi’s development spanned hardware, software, and 3D design using the following stack:
- 3D Modeling & Printing: Designed in Blender and sliced with Ultimaker Cura for 3D printing.
- UI Design: Mockups and UI wireframes created using Lopaka.
- Animation & Pixel Art: Animations designed in Adobe After Effects before being converted to C++ bitmaps. Custom pixel art drawn directly on a mobile device using Samsung Penup.
- Firmware Engineering: Written in C++ using the Arduino framework atop ESP-IDF, developed in VS Code with PlatformIO.
This guide contains everything you need to build your own Mochi from scratch. It is split into two parts: a Builder’s Guide for anyone who just wants to solder it together and play, and an Engineer’s Deep Dive for those looking to understand, fork, or improve the codebase.
What Can Mochi Do?
- 🐾 Interactive Digital Pet: Mochi plays cute, randomized idle animations and melodies while sitting on your desk. Its expressive face reacts to the time of day and current weather.
- 📱 Smartwatch Alternative (BLE): Connects to your phone via the Chronos app to receive instant notifications, call alerts, and texts without needing to pick up your phone.
- ⛅ Live Weather & Clock: Automatically syncs the exact local time (NTP) and fetches real-time weather data for your city over Wi-Fi. Features unique weather pixel art (like Rainy Mochi, Foggy Mochi, and Sleepy Mochi for nighttime).
- 🎵 Now Playing Monitor: Displays the current song playing on your phone (Spotify, YouTube, etc.).
- 🍅 Pomodoro Productivity Timer: Built-in 25/5 minute focus timer to keep you on task. Start, pause, and reset the timer using simple touch gestures.
- 🔋 Smart Power Management: Features hardware-optimized Light Sleep for a 99.9% power reduction when you “Power Off” the device, letting it run on a battery for ages. It even includes advanced software protection to gracefully go to sleep if the battery is dying, preventing nasty boot-loops.
- ⚙️ Easy Configuration: No hardcoding required! Features a pop-up Wi-Fi portal on your phone to enter your network credentials and city, plus a built-in Settings menu on Mochi to toggle sound, clock formats, and power modes.
Part 1: The Builder’s Guide (For Laymen)
Building Mochi is a straightforward weekend project. It requires minimal soldering and standard maker components.
Hardware Required
- ESP32-C3 SuperMini (or DevKitM-1) - The brains of the operation. Small, powerful, and features built-in Wi-Fi and Bluetooth.
- 0.96” I2C OLED Display (SSD1306) - Mochi’s face.
- TTP223 Capacitive Touch Sensor - The only “button” on the device.
- Piezo Buzzer - For notifications and melodies.
- TP4056 Module (with DW01 protection) - Handles safely charging the battery via USB.
- 3.7V LiPo Battery (e.g., 300mAh - 500mAh) - To make Mochi portable.
- Wires & Soldering Iron - For putting it all together.
- (Optional) 3D Printed Case - Download the STLs here: Core, Core 2, and Helmet.
Wiring Guide
Connections are extremely simple. Ensure your ESP32-C3 is unplugged from USB while wiring.
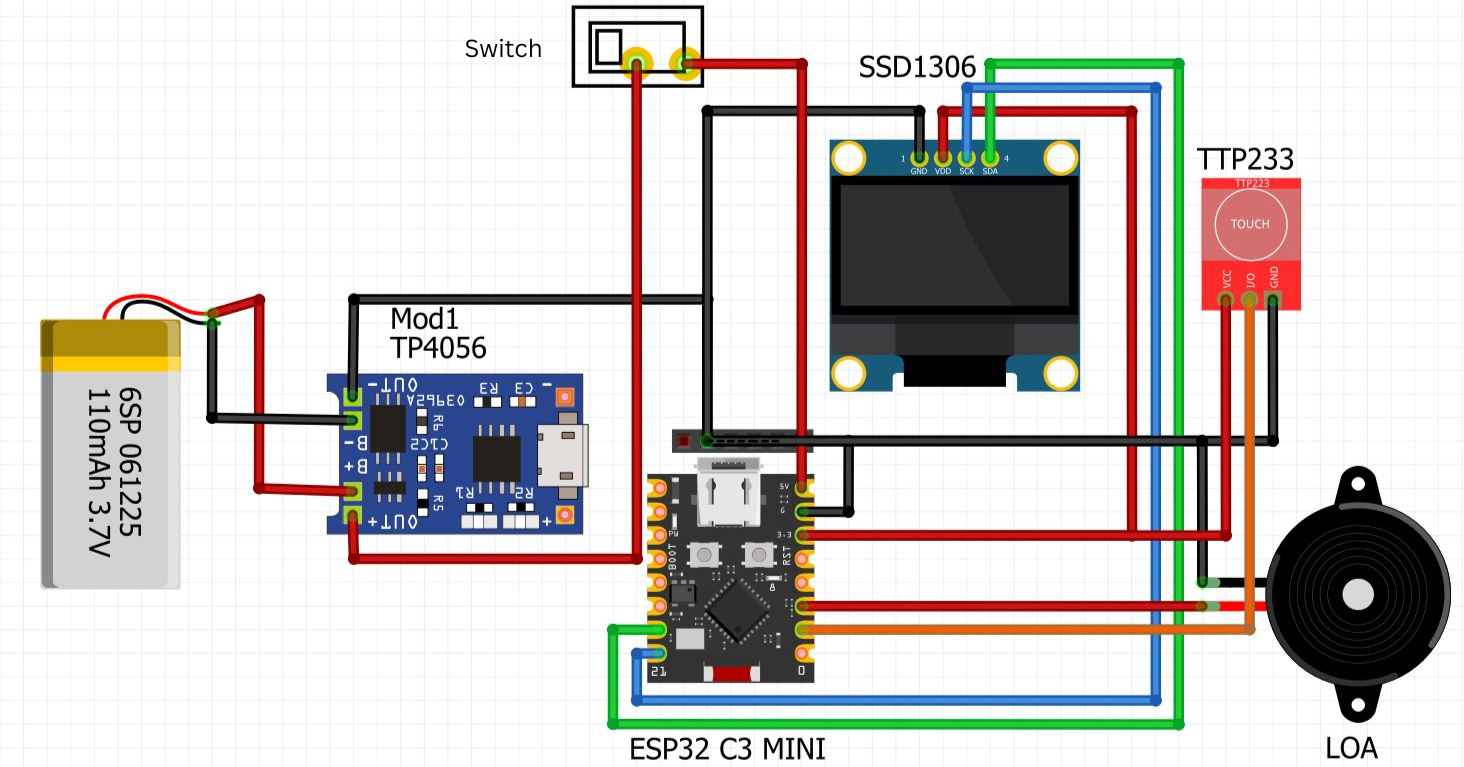
| Component | Pin on Component | Pin on ESP32-C3 |
|---|---|---|
| OLED Display | VCC | 3.3V |
| GND | GND | |
| SDA | GPIO 21 | |
| SCL | GPIO 20 | |
| Touch Sensor | VCC | 3.3V |
| GND | GND | |
| SIG / I/O | GPIO 10 | |
| Piezo Buzzer | Positive (+) | GPIO 2 |
| Negative (-) | GND |
Power/Battery Loop:
- Connect the LiPo Battery to
B+andB-on the TP4056. - Connect
OUT+on the TP4056 to the5V(orVBUS) pin on the ESP32-C3. - Connect
OUT-on the TP4056 toGNDon the ESP32-C3. (Note: To charge Mochi, plug a USB cable into the TP4056, not the ESP32-C3 directly, unless you build a diode-isolated circuit).
Flashing the Firmware
We use PlatformIO to compile and upload the firmware.
- Download and install VS Code and the PlatformIO extension.
- Clone or download this repository and open the folder in VS Code.
- Plug your ESP32-C3 into your computer via USB.
- Click the Upload arrow at the bottom of the VS Code window. PlatformIO will automatically download the necessary libraries and flash the firmware.
How to Use Mochi
- Startup: Mochi will boot up and play a greeting melody.
- Initial Setup: Touch the sensor for 4 seconds during the boot screen to skip Wi-Fi setup if you just want a standalone pet. Otherwise, wait, and Mochi will host a Wi-Fi network called “Mochi” (Password:
mochisetup). Connect to it on your phone. A captive portal will appear where you can input your home Wi-Fi credentials and customize the city used for weather forecasts! - Navigation: Tap the sensor to cycle between screens (Clock -> Mochi Face -> Music/Now Playing -> Pomodoro).
- Settings Menu: Long press (2 seconds) on any screen to open Settings. Tap to cycle, long-press to select. You can toggle Sound, 24H/12H clock, re-open the Wi-Fi Portal, or Power Off.
- Smartwatch Sync: Download the Chronos app on your phone. Important Initial Setup: For the very first connection, you must manually enter Mochi’s explicit Bluetooth MAC address in the Chronos app settings. After this one-time setup, Chronos will automatically reconnect to Mochi in the future! Pair it to receive notifications, weather updates, and media controls. (Tip: To get the Now Playing screen to properly show music from Spotify/YouTube, you must set the music app in Chronos to either ‘KakaoTalk’ or ‘Viber’)
Part 2: The Engineer’s Deep Dive (Firmware Architecture)
For developers, Mochi is built using the Arduino framework atop ESP-IDF, compiled via PlatformIO.
Core Architecture
The codebase is heavily modularized to prevent main.cpp from becoming a monolithic mess. It runs on a cooperative multitasking loop (loop()), driven by millis() timers rather than FreeRTOS tasks, to ensure display rendering (Adafruit_SSD1306) and I2C communications aren’t interrupted by thread preemption.
Key Modules:
ui_renderer: Handles all OLED drawing. Separates the display logic (bitmaps, text placement) from the application state.animation_player&animation_catalog: Converts byte-arrays into frame-by-frame animations (Mochi waking up, sleeping, etc.) using PROGMEM to save RAM.touch_input: A debounced, state-machine wrapper for the capacitive sensor. Differentiates between short taps, long presses (2s), and extra-long presses (4s).sound_manager: A non-blocking melody player. It parses string-based music sheets (e.g.,"C6 150 50") and plays them asynchronously without halting the UI.wifi_portal&time_service: Handles the captive portal for credentials, fetching NTP time, and parsing Open-Meteo JSON payloads.
Power Management & Sleep Logic
Mochi features an advanced, hardware-aware power management system designed to circumvent common ESP32-C3 pitfalls.
-
Light Sleep vs. Deep Sleep:
- The user triggers “Power Off” from the Settings menu.
- The ESP32-C3 does not support Deep Sleep wakeup via standard GPIOs (like our touch sensor on GPIO 10)—it only supports RTC GPIOs (0-5).
- Because of this hardware limitation, Mochi utilizes
esp_light_sleep_start()withgpio_wakeup_enable(). - Before sleeping, the OLED and Buzzer are explicitly powered down (
SSD1306_DISPLAYOFFandLOW). Current draw drops from ~120mA to ~100µA. - Ghost-Tap Prevention: The code enters a blocking
while(digitalRead(kTouchPin))loop before and after sleep to ensure the user has physically removed their finger, preventing instant wakeups or accidental phantom taps upon waking.
-
Brownout Boot-Loop Prevention:
- ESP32s are notorious for entering infinite boot-loops when battery voltage drops and internal resistance spikes during the Wi-Fi radio initialization.
- We intercept this by checking
esp_reset_reason()at the very top ofsetup(). - If
ESP_RST_BROWNOUTis detected, Mochi intercepts the boot sequence, flashes “BATTERY LOW” on the OLED, and immediately forces a Light Sleep. This breaks the boot loop gracefully and waits for the user to charge the device and tap to restart.
Dependencies
fbiego/ChronosESP32&h2zero/NimBLE-Arduino: Handles the heavy lifting for the smartwatch BLE GATT server, using the highly efficient NimBLE stack instead of the bulky default ESP32 BLE stack.Adafruit SSD1306: Display driver. We use a custom 128x64 buffer.
Known Technical Debt
- Blocking Wi-Fi Portal: The
WiFiManagercaptive portal is currently blocking. If the user doesn’t skip it or fill it out, the device hangs insetup()until it times out. A truly asynchronous portal would allow animations to play while waiting for credentials. - Animation Frame Rates: Animations are currently tied to the main
loop()frequency. If BLE parsing or HTTP weather requests block the loop for >50ms, animations will stutter. Future refactors should offload HTTP requests toCore 0(if migrating to dual-core ESP32s, though the C3 is single-core) or use purely asynchronous HTTP clients. - Global State:
main.cppstill holds a significant amount of global state (screenMode,notificationActive, etc.). Refactoring into an explicit Event Bus or State Machine class would improve testability.